How to Fix Clearcoat Scratches the Right Way
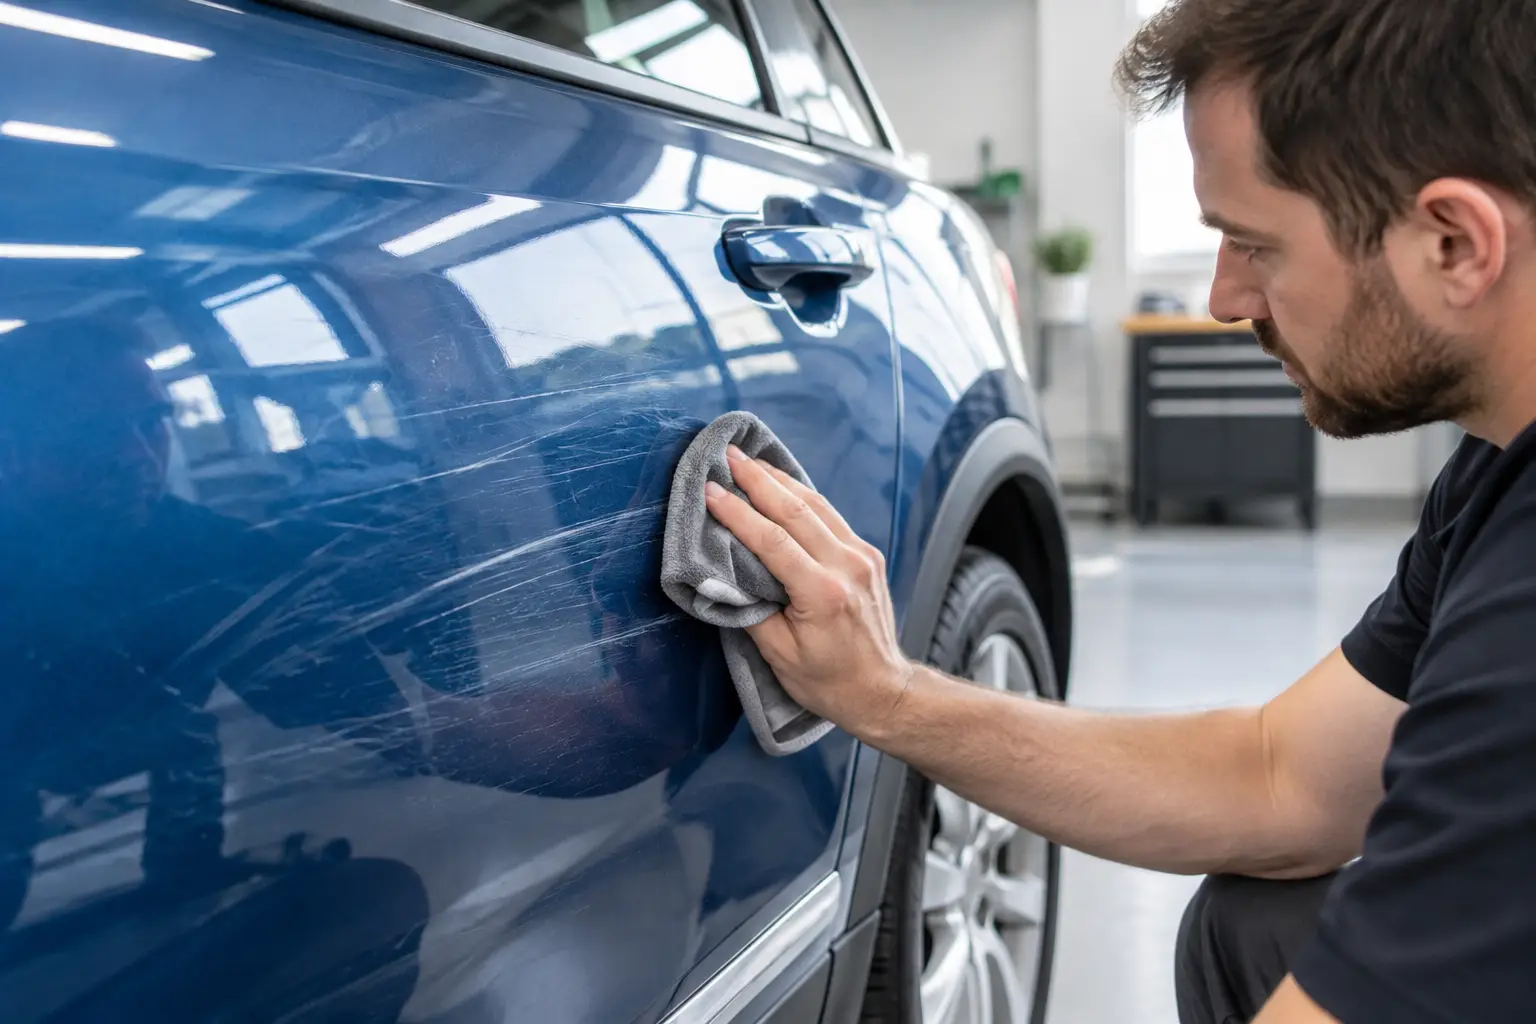
A scratch can look far worse than it is under direct sunlight, especially on dark paint. The good news is that many marks never reach the color layer. Knowing how to fix clearcoat scratches starts with identifying the damage correctly, then choosing the least aggressive method that will restore clarity without thinning the finish unnecessarily.
For Metro Detroit drivers, that matters. Winter washing, road grit, automatic car washes, snow brushes, and everyday parking lots all leave their mark. A proper repair can bring back gloss and improve resale presentation, but an aggressive DIY attempt can turn a small defect into a larger paint correction project.
What Is a Clearcoat Scratch?
Modern automotive paint is usually built in layers. Primer sits beneath the color coat, and a transparent clearcoat protects that color while creating the deep gloss most owners want. A clearcoat scratch affects only that top transparent layer. It may look white or hazy because the scratch scatters light, not because the paint color has been removed.
Clearcoat scratches commonly come from improper washing, dry wiping dust from the panel, brush-style car washes, dirty towels, tree branches, or contact with bags, belts, and fingernails near door handles. They are often repairable through careful polishing.
The challenge is that not every visible scratch is a clearcoat scratch. If the mark has cut through to the color coat, primer, or bare metal, polishing alone will not make it disappear. It may improve the surrounding finish, but the damaged area will still need touch-up paint, spot repair, or refinishing depending on its depth and location.
How to Tell Whether the Scratch Is in the Clearcoat
Start with a clean panel. Dirt can hide a shallow mark or make a scratch appear deeper than it is. Wash the area using proper automotive wash products, dry it with a clean microfiber towel, and inspect it under strong natural light or a focused inspection light.
A simple fingernail test can help. Lightly move your fingernail across the scratch, not along it. If your nail does not catch, the defect is typically shallow and may be corrected with a finishing polish. If it catches slightly, it may still be within the clearcoat but will require more careful correction. If it catches firmly, looks colored, or exposes a gray, white, or metallic layer beneath, it is likely too deep for conventional polishing.
There is another important clue: a scratch that appears white on a black vehicle is not automatically through the paint. Clearcoat damage often reflects white in the light. On the other hand, a colored transfer mark from another vehicle, a shopping cart, or painted object may sit on top of the clearcoat and can sometimes be removed with a safe decontamination or polishing process.
The Safest Way to Fix Clearcoat Scratches
The best approach depends on the scratch depth, paint condition, and the vehicle's available clearcoat thickness. Paint correction removes a microscopic amount of clearcoat to level the surface around a scratch. That is why the goal is improvement with the least amount of material removal, not chasing every defect until it vanishes.
Start With Proper Cleaning and Decontamination
Never polish a dirty panel. Remaining grit can create additional swirls as you work. After washing and drying, remove embedded contamination if needed with a paint-safe decontamination process. The surface should feel smooth before correction begins.
Avoid household cleaners, rough paper towels, and abrasive scrub pads. They can dull the clearcoat and add more marring around the original scratch. A clean microfiber towel and dedicated automotive products are the right starting point.
Use a Test Spot Before Correcting the Whole Panel
A test spot is the professional standard because every vehicle responds differently. Paint hardness varies by manufacturer, panel, age, prior repairs, and environmental exposure. A mild finishing polish may erase light wash marring on one vehicle while doing very little on another.
Start with the mildest effective combination: a quality finishing polish, a soft foam pad, and controlled machine polishing. Work a small section, wipe away residue with a clean microfiber towel, then inspect the result under proper lighting. If the scratch improves enough, there is no reason to increase aggression.
For light defects, a hand-applied polish can offer some improvement, though it is harder to achieve consistent correction by hand. Machine polishing is generally more effective, but it also requires knowledge of pad selection, pressure, speed, heat, and paint behavior. Poor technique can leave haze, create uneven results, or remove more clearcoat than necessary.
Step Up Only When the Paint Needs It
Moderate clearcoat scratches may require a compound followed by a refining polish. Compounding cuts faster and can level deeper defects, but it often leaves behind haze that must be polished out to restore a crisp finish. This two-step approach is common in professional paint correction.
Deep scratches are where restraint matters most. Wet sanding can reduce the appearance of select defects, but it is not a casual DIY method. It removes clearcoat quickly and can create visible sanding marks, burn through edges, or expose the color coat if performed incorrectly. On a newer vehicle, luxury finish, or lease return, the risk often outweighs the benefit without professional inspection.
When Polishing Will Not Fix the Scratch
Polishing cannot replace missing paint. If a scratch reaches the color coat, primer, or metal, correction can soften its edges and make it less noticeable, but it cannot restore the original paint layer.
Deep damage may need touch-up paint for protection, particularly when metal is exposed. Even a small chip can allow moisture to reach the panel and eventually contribute to corrosion. A touch-up repair can be practical for a daily driver, while a more visible panel or higher-value vehicle may justify a more refined paint repair or repaint.
The location also matters. Damage on a flat door panel is easier to blend visually than a scratch on a sharp body line, bumper edge, or hood edge, where clearcoat is naturally thinner and machine-polishing risk is higher. Paint protection film may be a better long-term answer after repair for areas that take repeated abuse, such as front bumpers, rocker panels, door cups, and loading edges.
Common Mistakes That Make Clearcoat Damage Worse
Quick-fix products can be tempting, but many only fill scratches temporarily with oils or fillers. The mark may look reduced until the next wash, then return once those ingredients wear away. A true correction levels the clearcoat around the defect rather than masking it.
Scratch-removal kits also vary widely in abrasiveness. Applying a heavy compound across an entire panel to address one small mark can leave the paint looking flatter or hazier than before. The same applies to using toothpaste, kitchen sponges, or generic rubbing compounds. These methods are inconsistent and can cause more visible marring.
Automatic tunnel washes are another common reason corrected paint quickly develops new swirls. Brushes and contaminated wash media drag fine debris over the surface. A careful hand wash with clean mitts, lubrication, and dedicated drying towels helps preserve the result after correction.
Protect the Finish After Paint Correction
Once the scratch has been corrected, protection is what keeps the finish looking better for longer. A quality sealant or wax can add gloss and provide short-term protection. Ceramic coatings offer longer-lasting chemical resistance, easier cleaning, and improved water behavior, though they do not make paint scratch-proof.
For high-impact areas, paint protection film provides a physical barrier that coatings cannot match. It is especially useful for vehicles driven regularly through Michigan winters, where salt, gravel, and road debris can take a toll on exposed paint. The right protection depends on the vehicle, driving habits, budget, and how long you plan to keep it.
Professional paint correction is also valuable when you want measurable improvement without guessing at paint condition. At MYNT Customs, correction work is approached as a finish-preservation service, with the goal of restoring gloss while respecting the limits of the paint system.
A Better Standard Than “Perfect” Paint
No driven vehicle remains flawless forever, and trying to remove every deep scratch can sacrifice more clearcoat than it is worth. The better goal is a finish that looks clean, glossy, and well cared for while retaining enough clearcoat for future maintenance. Address shallow defects early, protect vulnerable areas, and treat deep damage before it becomes a larger repair.